Home Media Rooms & In-Home Theatres Create Immersive Entertainment

Who doesn’t love to binge watch their favorite TV show or gather with family and friends for a night out at the movies? The average family of four spends about 1,785 hours each year watching television and $2,500 annually on entertainment. Our love of film and ever-advancing technical innovation have been major catalysts in bringing our go-to entertainment into home media rooms and in-home theatres.

Media rooms and home theatres have become a mainstream must-have, bringing the immersive movie-going experience directly to the viewer. These specialty entertainment spaces can be a dedicated room designed as a full-blown media room, or, for homes without a separate space, living and great rooms can just as easily be transformed into home theatres.

There are multiple technical and aesthetic areas to consider when designing a media room in a home.

Single or Multi-Screen

For movie enthusiasts or families who enjoy watching television, a large single screen is an ideal option. But sports fans often prefer having multiple screens, allowing them to watch several games at one time. Video gamers are another group who benefit from multi-screens as it offers them a first-person perspective especially when engaging with other players.

HD Projector or SmartTV

The choice of an HD projector or Smart TV for a media room depends upon the wall space and the distance viewers will sit from the screen. HD projectors are similar to what is used in commercial theatres and come in a wide variety of sizes, with the most popular sizes ranging from 100 to 120 inches. High definition Smart TVs are continuously increasing in innovative technology and screen size, with 80 inches being the largest to date.

Sound System

The most integral part of a memorable movie is the sound. “As any movie professional will tell you, big sound is more important than a big picture,” declares Harrell Design + Build Designer, Divya Vijayanandakumar. The standard sound system is a 5:1, with speakers located at the front and on the sides of the room along with a subwoofer. If space allows, upgrading to a 6:1 or 7:1 system, where speakers are also at the back of the room, creates a fully immersive sound experience. Since sound is such an important aspect of a home theatre, Divya highly recommends working with a Media Designer to achieve the best possible sound.

Acoustics & Soundproofing

Hand in hand with sound is the room’s acoustical design. Not only does it maximize auditory enjoyment, it is critical to ensuring sound remains inside the room to avoid disturbing other family members or nearby neighbors. Proper sound dampening and acoustics are achieved by installation of fabric panels on the walls, plush seating, carpeted floors, and fabric window coverings. For home theatres in open living spaces, it is best to choose a location away from bedrooms as complete sound dampening may not be achievable.

Seating

The initial step in seating choice goes back to the function and size of the space. Is it purely for movie and television viewing or will it also serve as a gaming space? On average, how many people will be using the media room? These details help determine the size and number of seats as well as their layout to ensure that each is the “best seat in the house.” There are a wide array of home theatre recliners, which can be either manually operated or motorized. Seat size and style options also vary widely, from large and plush to sleek in design. Most recliners have drink holders, and some offer built-in tables. According to Divya, a 10’ X 16’ room is the minimum space to comfortably fit two rows of seating.

Lighting

Proper lighting provides a number of different functions in a home theatre. Dimmable recessed lighting and wall sconces offer the best illumination for a variety of entertaining needs. Divya suggests avoiding table or floor lamps in media rooms to eliminate on-screen glare. If there are two levels of seating, illuminating stairs is important, especially when the space is darkened. She also recommends using a Smart system to pre-set and auto-control lighting within the space. Lutron Homeworks QS and Lutron Radio RA2 are two total home control systems that wirelessly manage both lighting and temperature. If the room has windows, installing motorized shades, which can also be controlled by a Lutron system, also helps create the perfect entertainment environment.

Drinks & Snacks

No movie would be complete without snacks! For many home theatres, a simple snack center with small refrigerator to keep beverages cold, a table-top popcorn maker, and a cabinet filled with candy and other goodies adds to viewer’s enjoyment. Larger media rooms can include a kitchenette space with built-in beverage station, fountain drinks on tap, a fully stocked snack center, and cabinets for storing extra munchies, blankets, and pillows.

From living rooms to a dedicated space designed to mimic the movie-going experience, media rooms and in-home theatres are highly desired by homeowners. Not only do they increase home value upon resale, they enhance lifestyles by connecting families through entertainment.

Schedule a complimentary consultation with one of Harrell Design + Build’s Designers to dial in your family’s home entertainment experience.

Harrell Design + Build Designers Win Multiple NARI META Awards

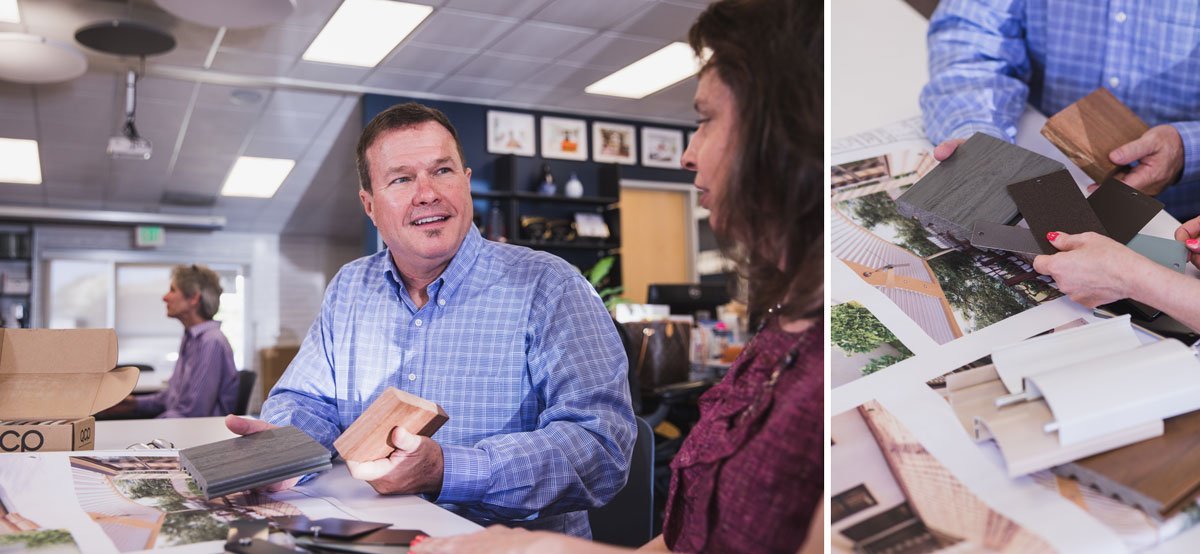
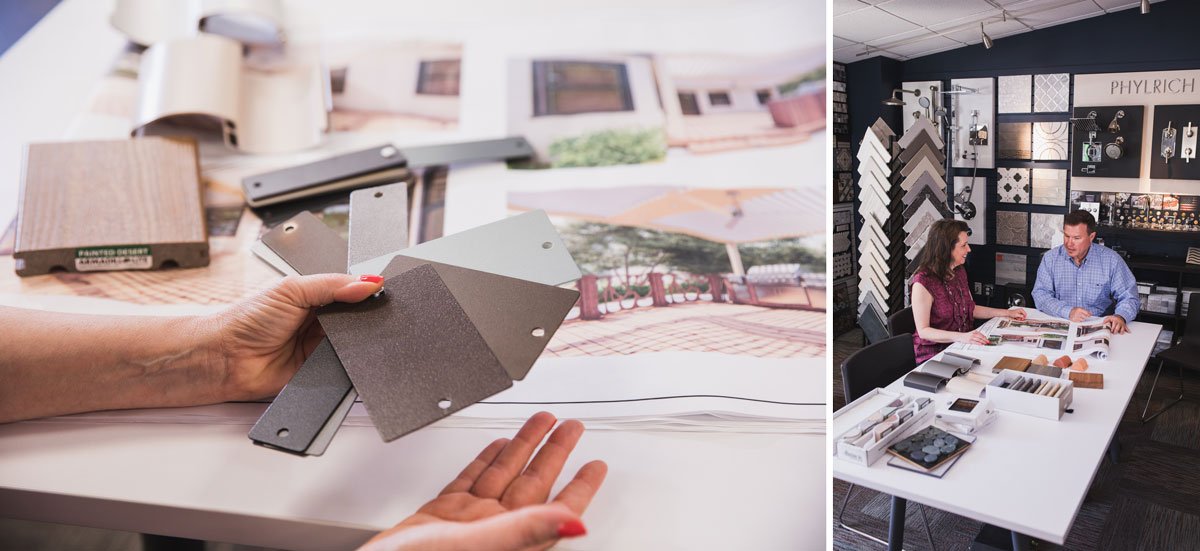
Two of Harrell Design + Build’s Designers were honored recently at the National Association of the Remodeling Industry (NARI) Silicon Valley awards gala. Gloria Carlson and Debra Winston received coveted META Remodeling Awards for multiple projects that transformed the homes of three Harrell Design + Build clients. Both designers have received META honors in the past but, as Gloria shares, “A large part of the award is the fact that we’ve solved very unique problems, making dramatic and often life-changing transformations in our clients’ homes. Clients love to feel that their needs were met but in such a way that their home was acknowledged as an award-winner.”

META, short for metamorphosis, “signifies the transformation process and beautiful results that can be accomplished through a remodeling project.” The Silver, Gold and Platinum awards are categorized by project price point and include everything from interior redesigns of kitchens, baths and living spaces to residential landscape design to entire home remodels.

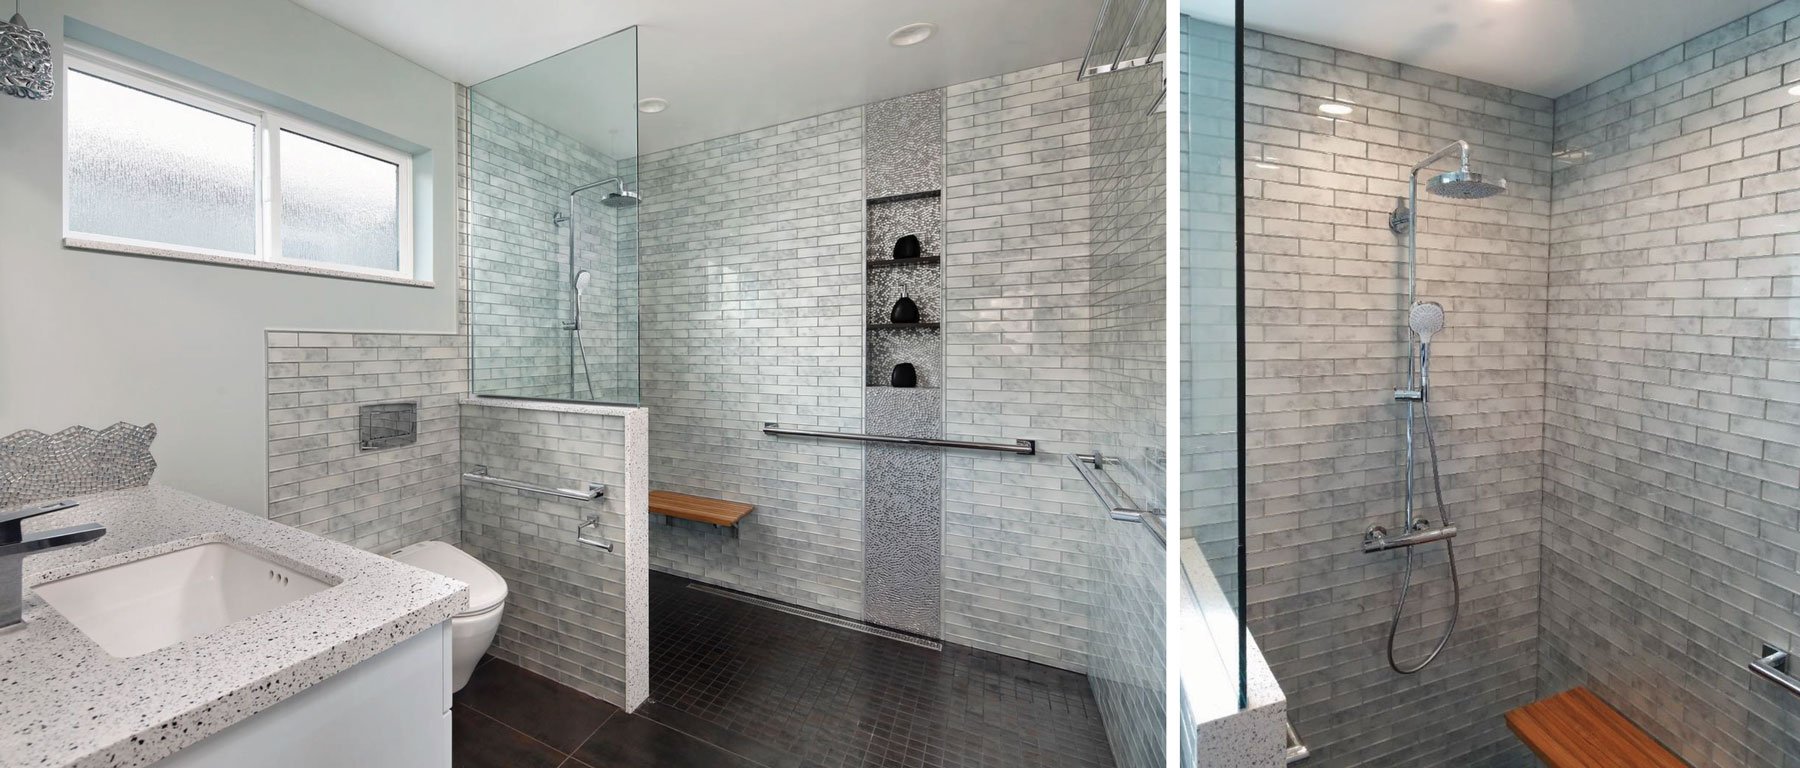
Designer Debra Winston won multiple META Gold awards for two projects within one residence, which incorporated Universal Design principles to enable the homeowners to age in place. The first project took a small, outdated master bathroom from “Blah to BLING” while the second Gold award winning project transformed the compartmentalized floor plan into a spacious and dramatic interior.

Blah to Bling

Two META Gold awards for Residential Bathroom under $100,000 & Universal Design Bathroom

“This couple isn’t afraid of color or of embracing their unique style and personality in the home,” Debra remarks. “This project definitely proves that Universal Design can be beautiful and functional.”

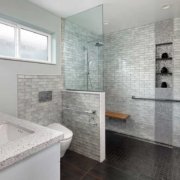
Dark, dated, and depressing, this original San Jose master bath was small and was not wheelchair-accessible. The corner shower was much too small for assisted bathing and had a high curb that created an entry barrier. Debra reconfigured the area, more than doubling its size by taking space from the hall bathroom. In its place Debra designed a stunning spacious roll-in shower with teak folding bench, grab bars, and a handheld shower to make bathing safe, easy and accessible. The wall-hung Toto Washlet toilet and white high-gloss floating vanity with Silestone quartz white platinum counters are functional and attractive. The “bling” comes from wall, floor, and backsplash tiles with burnished metallic finishes, glittering mosaics, and silver “ribbon candy” pendant lights that add sparkle.

Debra relates, “One of the wife’s guilty pleasures is collecting fragrances and nail polish. To display her collection in style while offering easily accessible storage, we added was a 16-inch X 5-foot Robern medicine cabinet.”
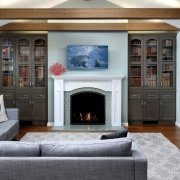
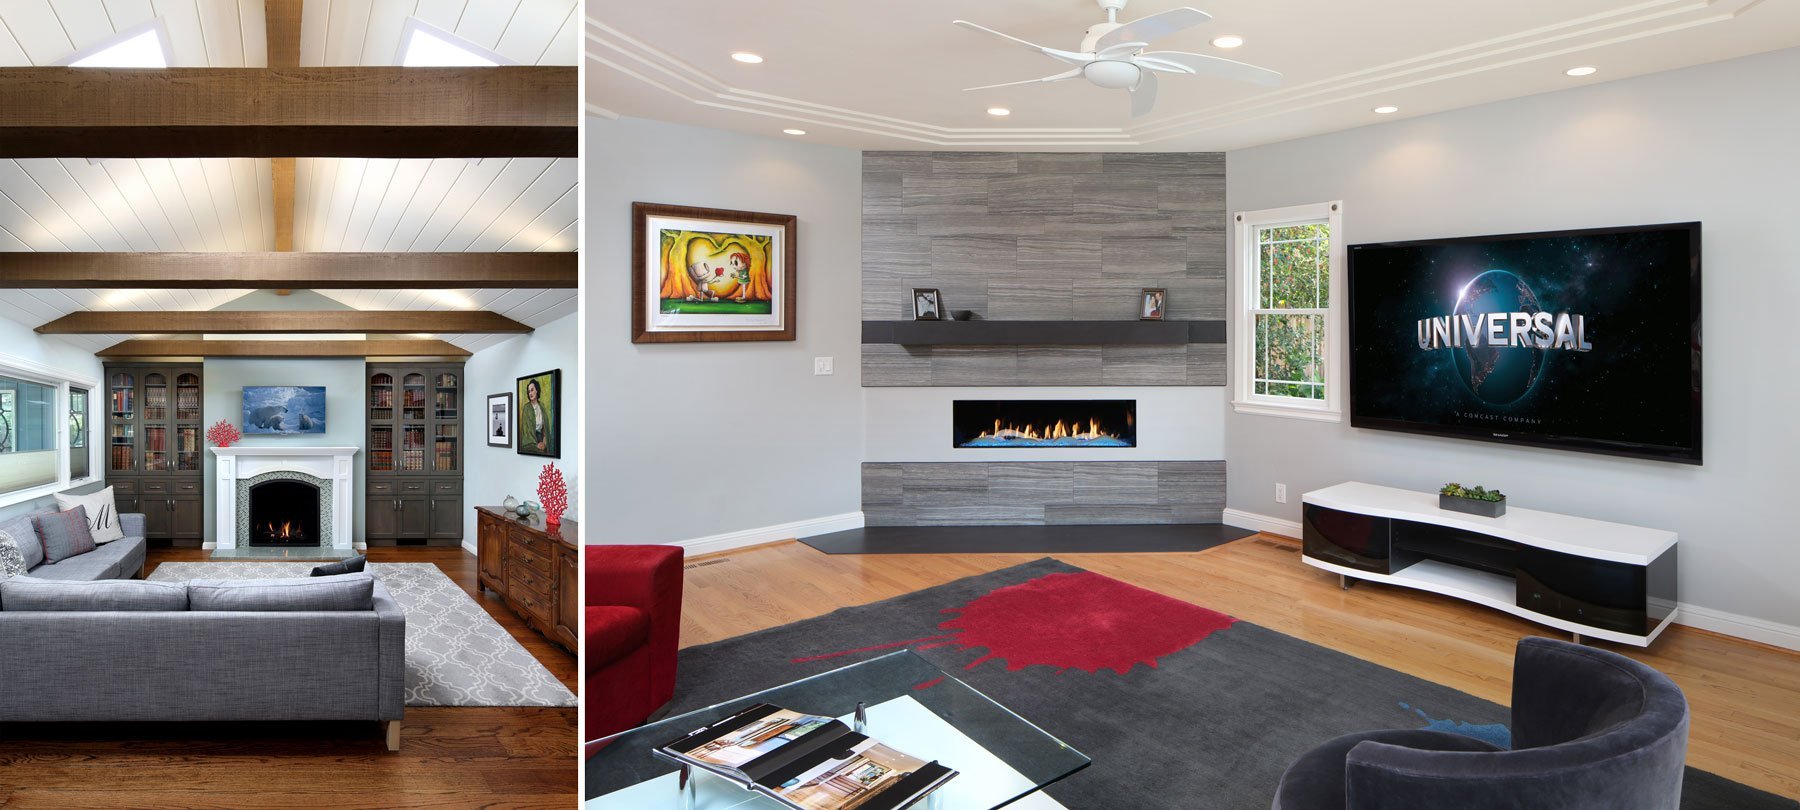
Dark to Dramatic

META Gold Award for Residential Interior $250,001-$500,000

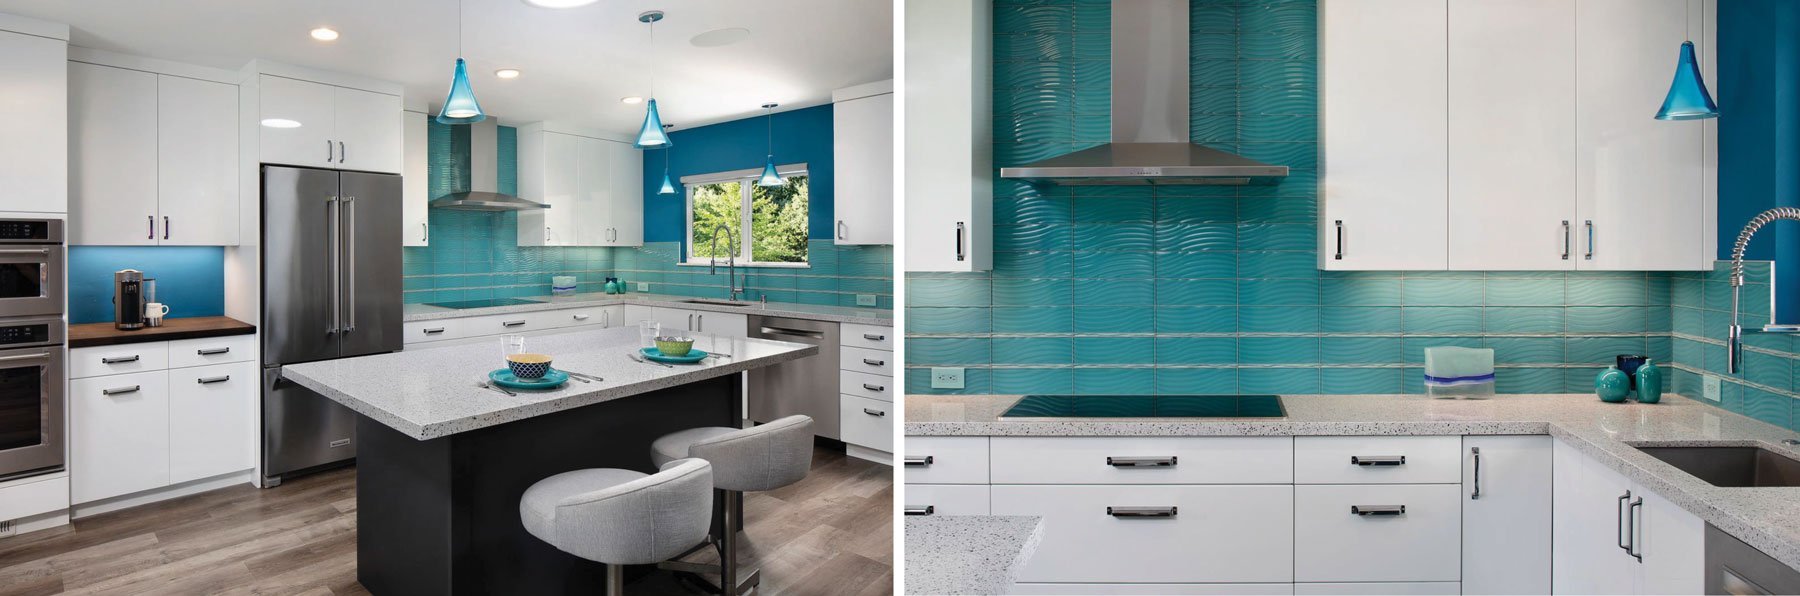
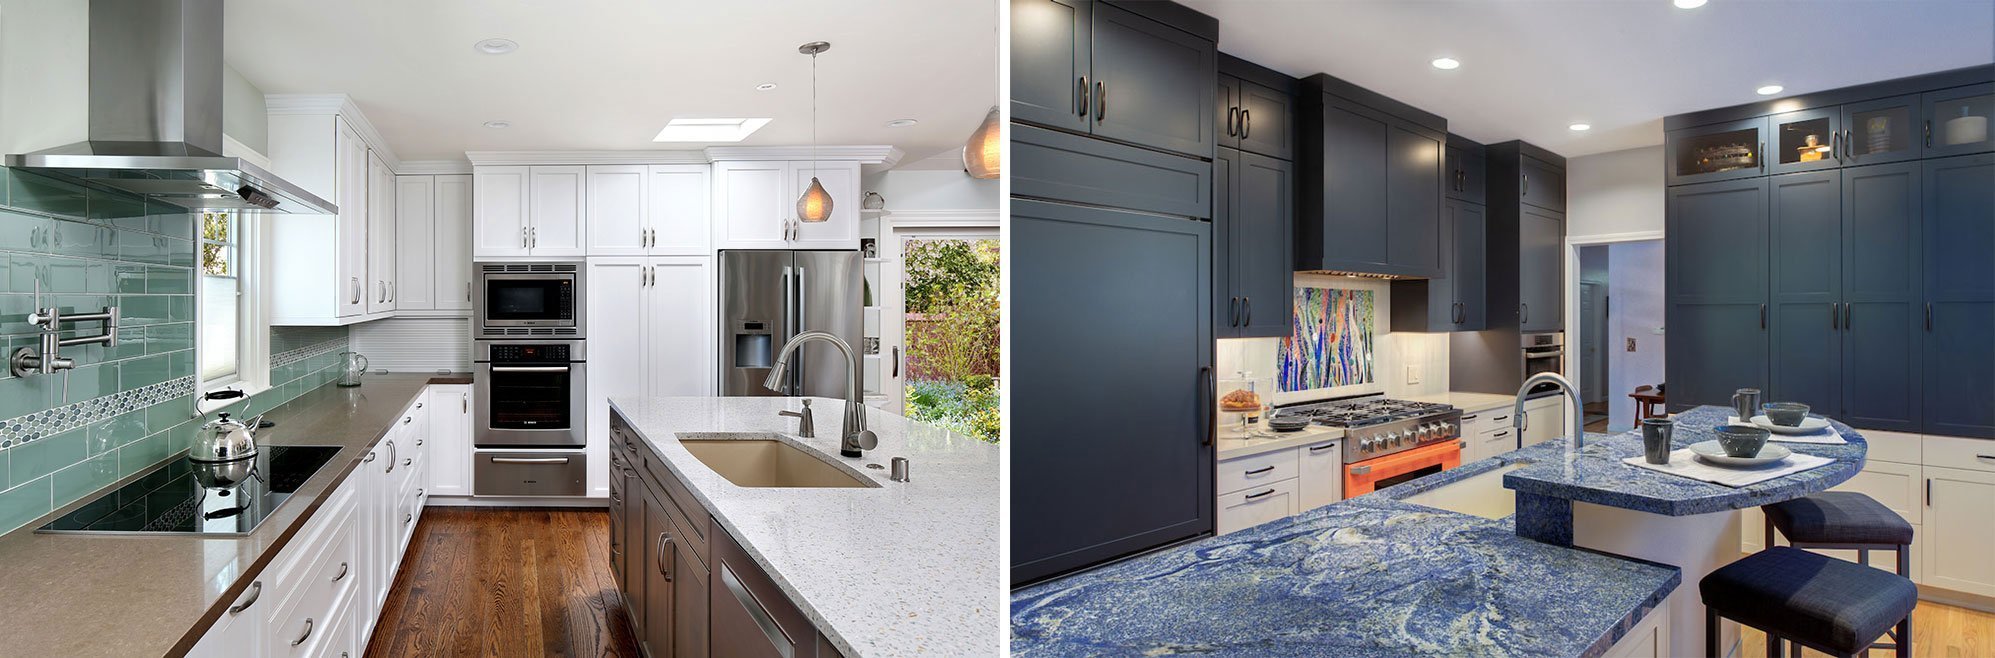
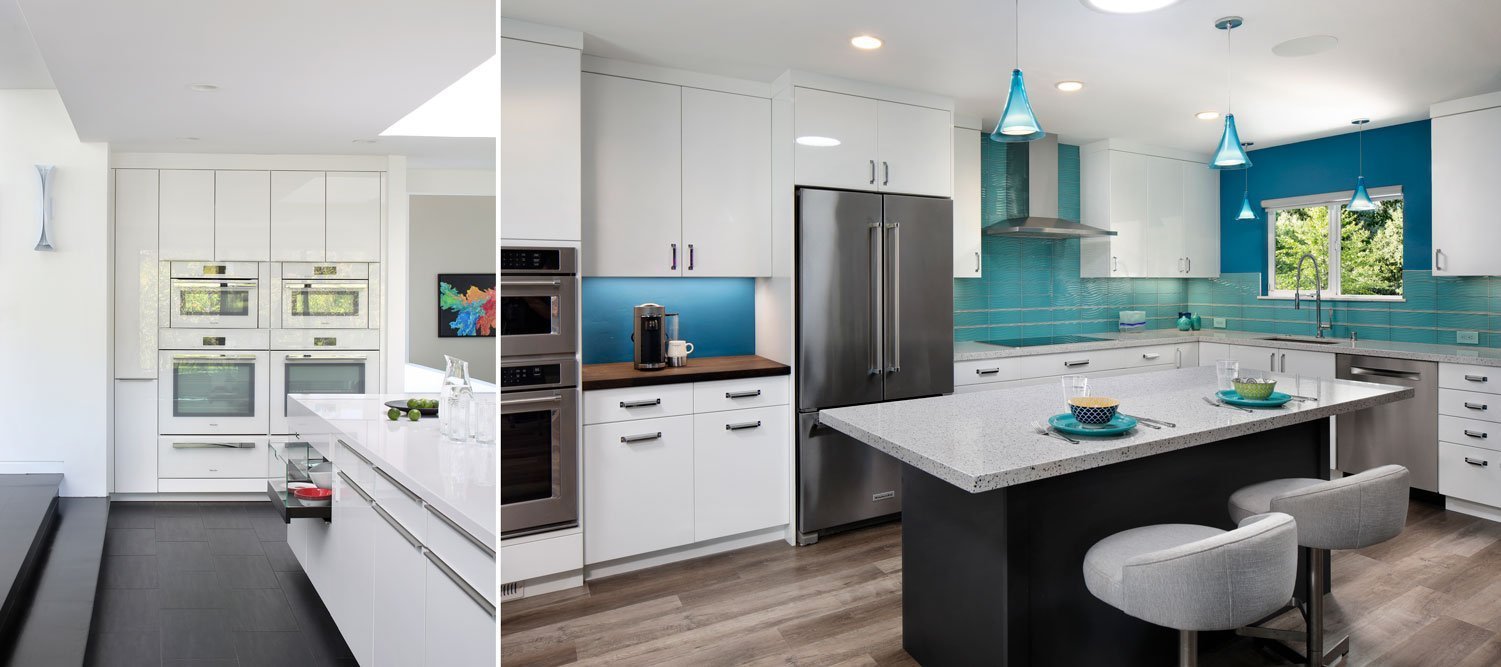
The same homeowners also needed to convert the entry, kitchen and great room of their home to increase functionality and accessibility. The existing 1950’s kitchen was dark, narrow, and closed off from the living space by a 16-foot long wall.

Removing the entry coat closet and the dividing wall created an open floor plan, allowing ease of movement and linking the great room and kitchen together. The same glossy white cabinets grace the updated kitchen and are accented by vivid glass “wavy” backsplash tiles and matching pendants above the contrasting dark island. The kitchen is illuminated with recessed lighting and a skylight.

Luxury vinyl plank flooring extends into the great room, which had a dated brick fireplace flanked by built-in bookcases with scalloped wood trim, all which had been painted white. The space was transformed by applying concrete over the existing brick for an industrial look, adding metal mesh door panels to the bookcases, and matching the color of the kitchen island. Floating shelves and an edgy wallpaper transform the space into one that is functional, accessible, and captures the homeowner’s distinct style.

“The homeowners aren’t afraid to be bold with color, texture, and design,” Debra explains. “In their previous home, they used a small-run “stealth print” wallcovering and decided to continue this adventurous design aesthetic by incorporating a fanciful skeleton wallpaper as a feature wall in their new great room.”

Last but not least, all interior doors were painted a charcoal gray, and the home’s exterior was modernized, removing the dated scalloped facia and adding horizontal cedar plank siding. The stucco was painted a deep teal and the exterior entry door a bright orange, creating curb appeal with significant WOW factor.

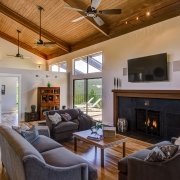
Small to Spacious & Stunning

META Gold Award for Residential Interior Remodel $100,000-$250,000

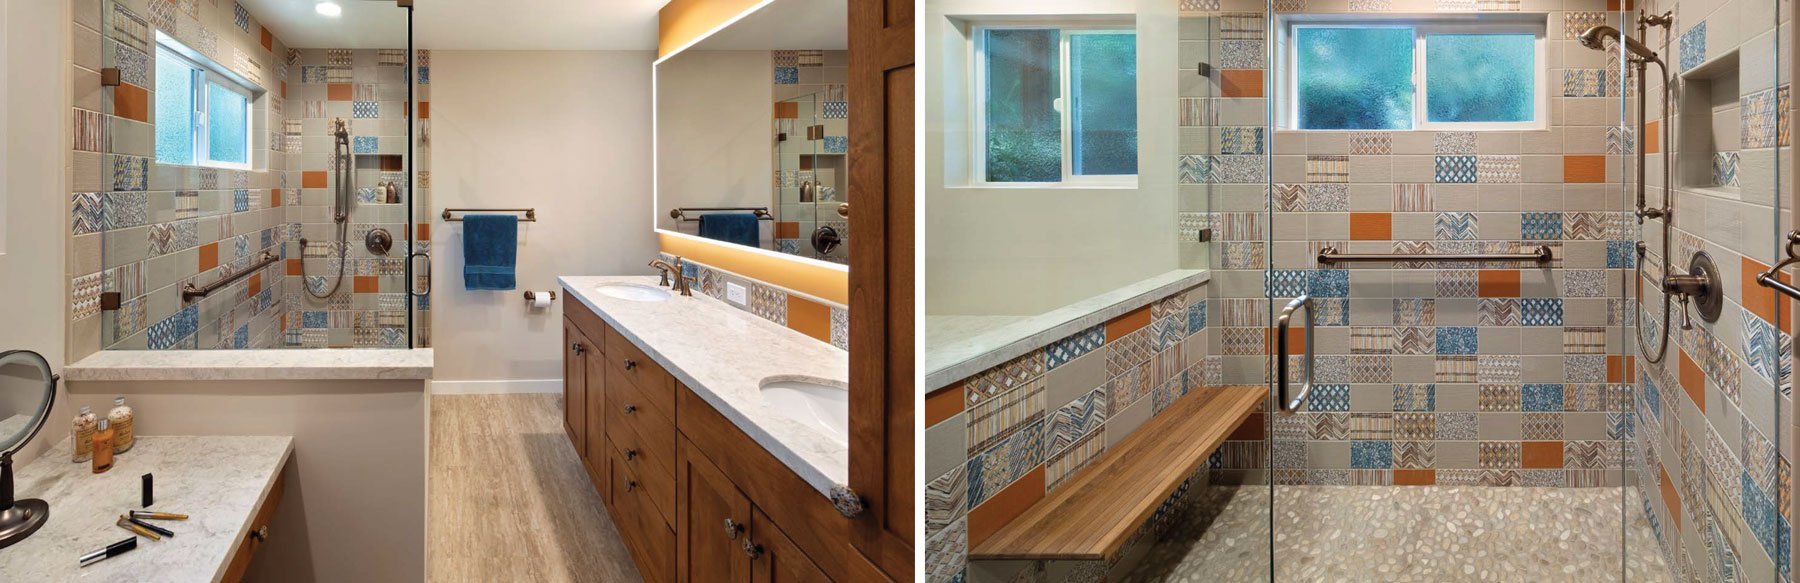
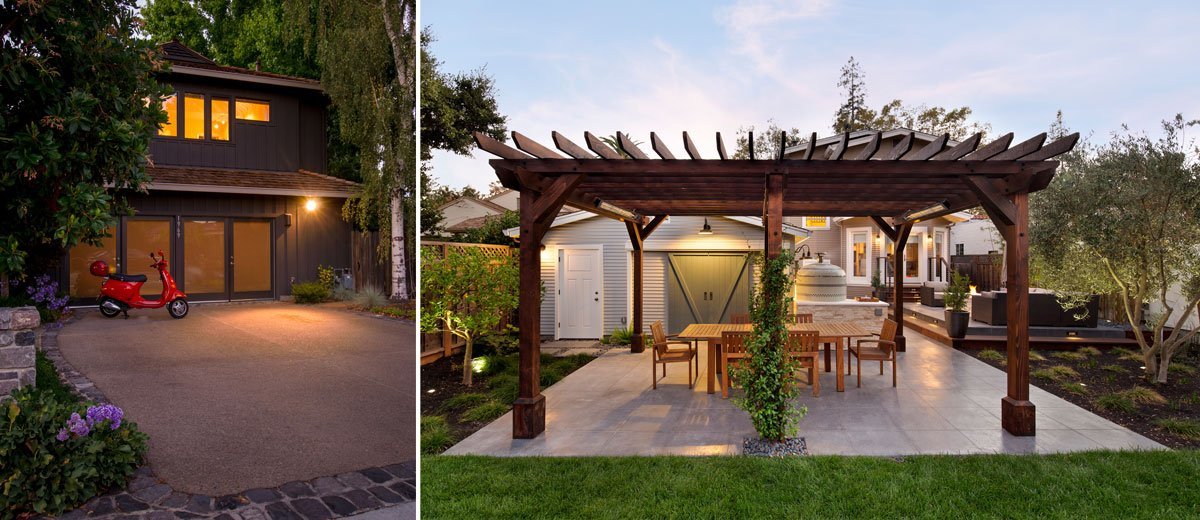
Harrell Design + Build Senior Designer, Gloria Carlson, was a META award winner for her transformative design on a two-story Menlo Park home. The layout of the client’s home restricted her ability to age in place as there was no bed and bathroom space on the main level that offered the necessary accessibility.

To achieve a functional, accessible, and beautiful master suite, Gloria reconfigured the existing floor plan, which included a barely usable ensuite “micro” bathroom and small closet, with an adjacent sub-standard “bedroom” that was too small to be used as one.

By incorporating the footprint of the second bedroom, Gloria created a luxurious master bathroom and walk-in closet, both 3-1/2 times larger than their original spaces. The once infinitesimal closet was expanded to a walk-in closet, allowing the owner to store all of her clothing in one place whereas before, it was scattered in various closets throughout the home.

A large shower includes accessibility features such as a low curb, folding teak bench and grab bars. The client and Gloria worked together to lay out the shower tiles to mimic hot air balloons floating skyward, reminding the homeowner of one of her favorite getaways.

Gloria interspersed numerous other personal touches reminiscent of vacations including custom cabinet knobs made from stones found near the owner’s beloved mountain cabin on the double vanity and seated make-up area.

“The homeowner is a tall woman and she wanted the bathroom designed to comfortably fit her height,” Gloria explains. “Now she has a master ensuite bath that not only fits her personality but her stature, enabling her to comfortably and safely live in her home for years to come.”

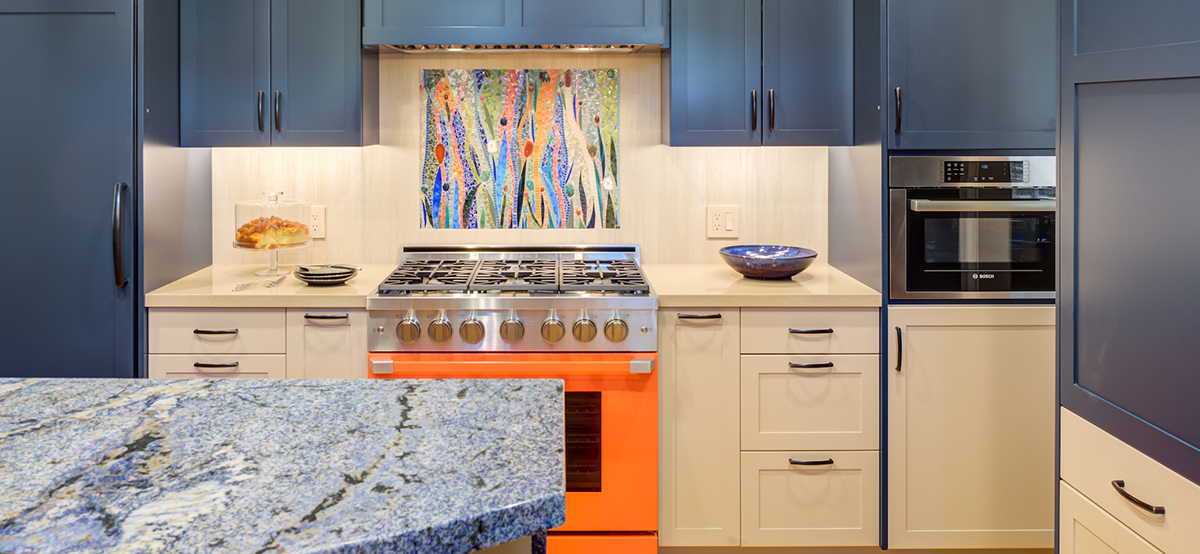
Baker’s Dream Kitchen & Functional Garage

META Gold Award for Residential Interior Remodel $250,001-$500,000

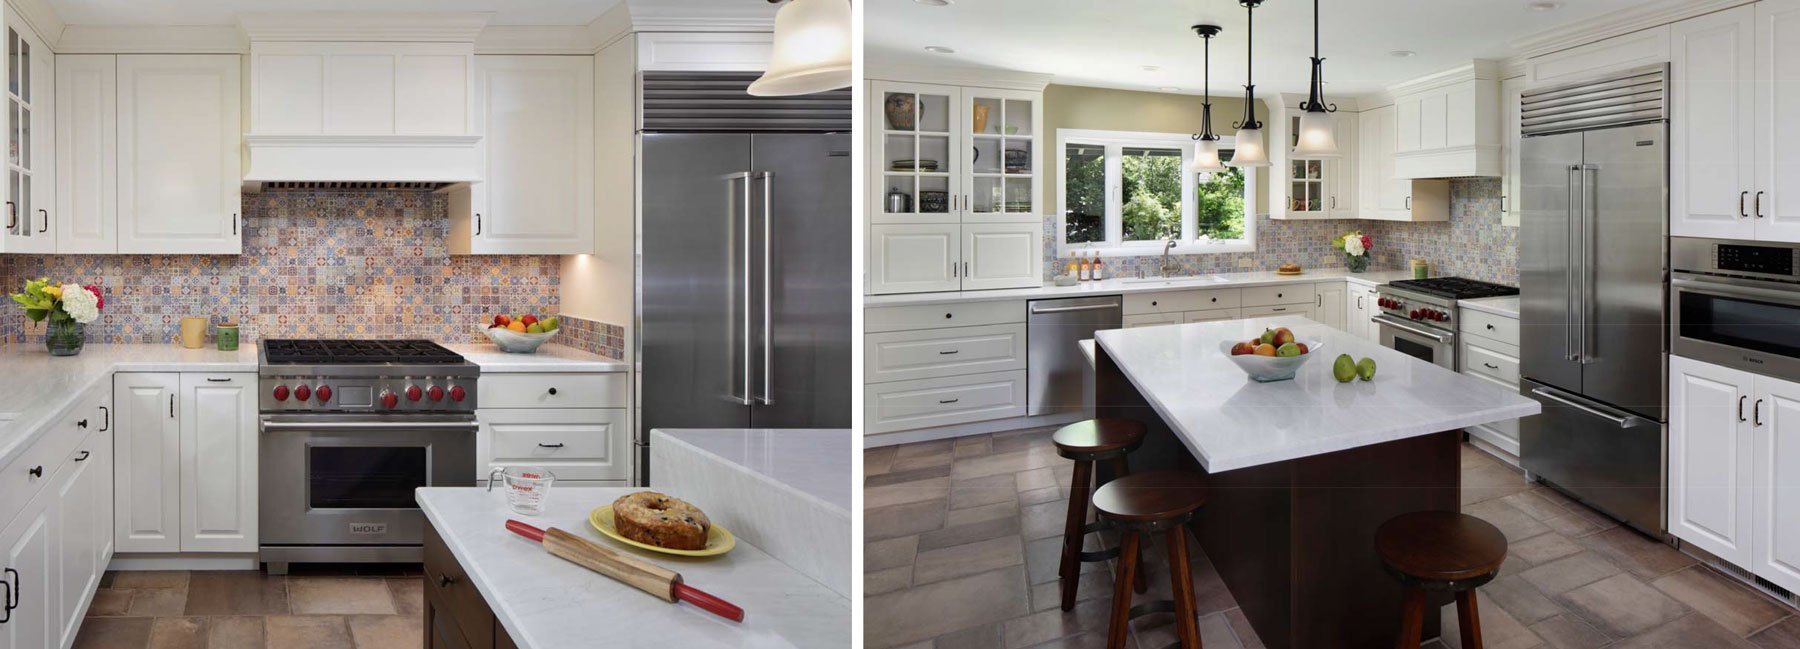
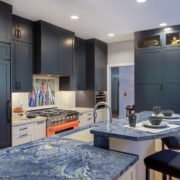
Gloria designed a dream kitchen for another Menlo Park client, a close-knit family that loves to bake. Their adult son is a professional baker while the husband makes 1,000 truffles at a time multiple times a year. Their kitchen was attractive yet the confined space was not conducive to the cooking and baking functionality this family desired.

“This family is very unique and as such, had very specific requirements and challenges to solve in their home remodel,” Gloria states. “Not only were they avid bakers and chefs but they had a menagerie of exotic pets whose needs they also wanted to embrace in their remodeling project.”

Significant changes to the structure were made to create the dream kitchen that fit the family’s lifestyle. A load-bearing wall was removed, and a massive engineered beam inserted into the ceiling framing opened the kitchen and dining areas. It also allowed for a large island with seating for four, a lower counter area for the son’s baking while the husband used the large, higher portion of the island for making his truffles. With so many special baking appliances and accoutrements, storage was at a premium. Appliance “garages” were added for mixers and other large items while overflow storage was added to the home’s garage. The end result is an open, expansive space filled with natural and artificial light, colorful cabinets, plentiful prep space and storage, high-end appliances, and a mosaic backsplash, which is a nod to the family’s Spanish heritage.

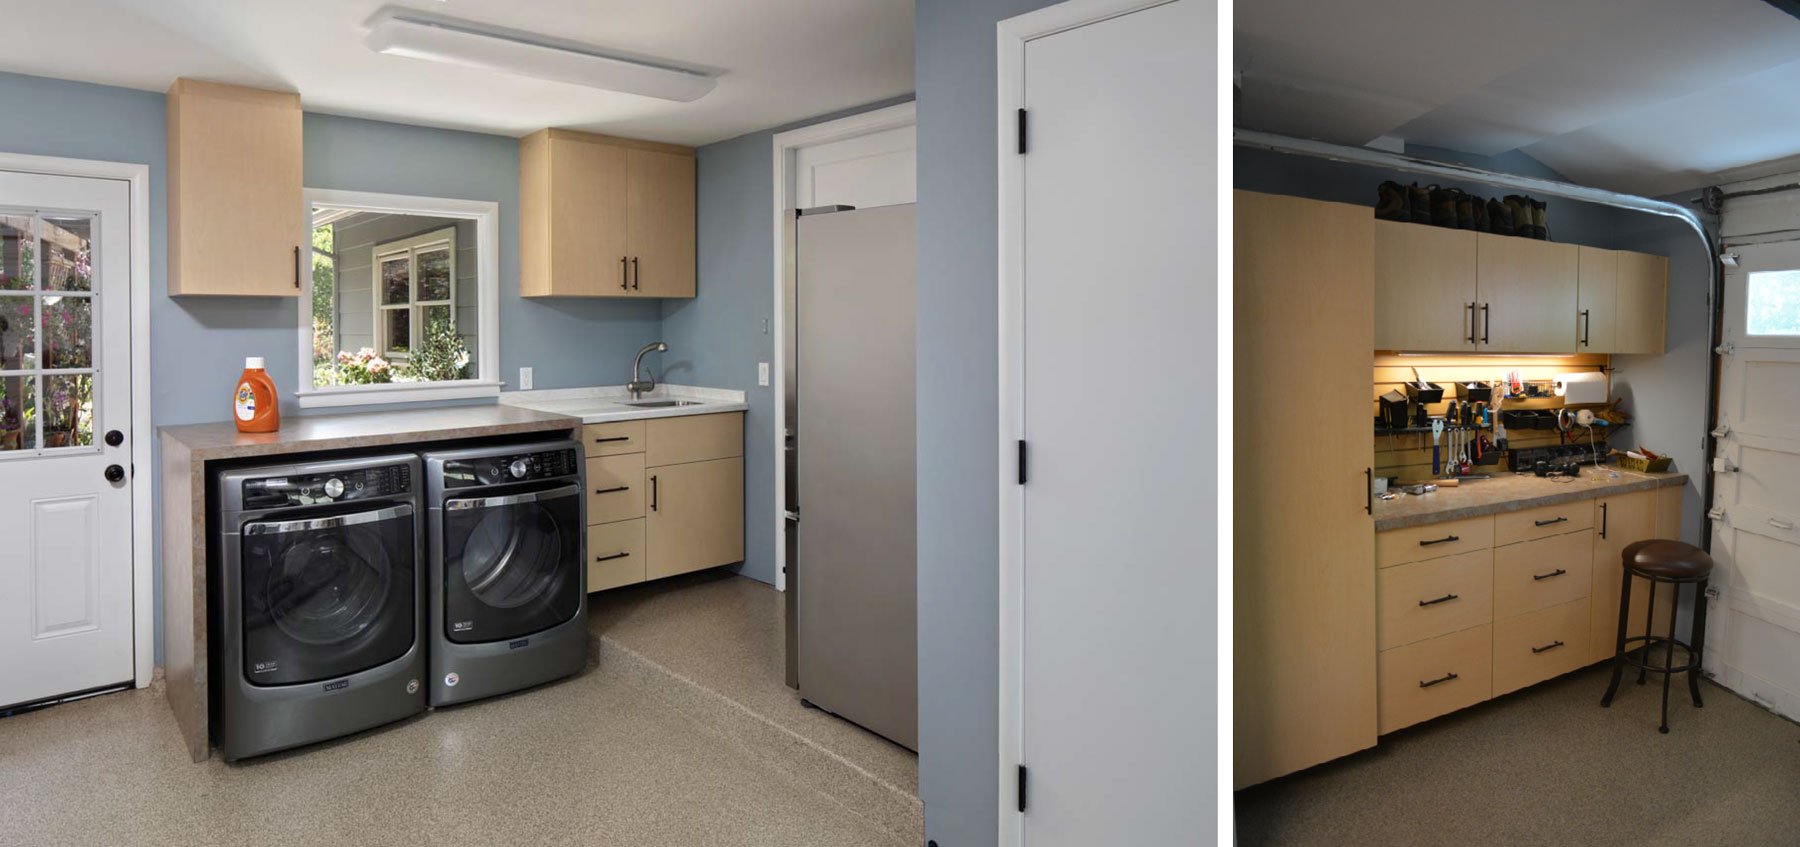
The garage itself also underwent a significant METAmorphosis, transforming it into a fully functional space for laundry and overflow kitchen storage. Gloria also designed a secure location to store high-end bicycles in addition to a separate area for storing food for their tortoises, iguanas, snakes and other reptile pets.

Founded by Iris Harrell, Employee-Owned Harrell Design + Build has been transforming distinctive homes since 1985 in the Bay Area. If you are considering a METAmorphosis of your Silicon Valley or Mid-Peninsula home, Harrell Design + Build’s award-winning Design + Build team can make your residential dreams a reality. Explore our website to see more of our projects, learn about our company or to schedule a complimentary consultation.

Hot Countertop Trends

A stunning countertop is one of the elements that makes for an amazing kitchen or bathroom. Countertops come in a myriad of materials but the latest countertop trends are making headway, edging out former top contenders.

Quartz continues to be a favorite among homeowners who are remodeling both kitchens and baths. According to Harrell Design + Build’s award-winning senior designer, Sara Jorgensen, nine out of ten Harrell clients choose quartz for their countertop materials. There are many “pros” to quartz including its durability, low-to-no maintenance, and the incredible variety it provides, with marble look-a-likes being the most popular.

“Besides the wide selection and low maintenance, quartz can be manufactured in jumbo slabs, which makes it ideal for expansive islands,” Sara says. “This means our clients can have a perfectly seamless and truly gorgeous countertop.”

The “newest kid on the block” when it comes to countertop trends, Sara explains, is epoxy. Epoxy is often used to resurface old countertops but can also be applied over wood. It must be created on-site versus typical counter materials which are fabricated offsite and installed at the residence.

Epoxy counters offer limitless variety in design including colors and patterns. It can be created to look like marble, granite, concrete, stone, or something completely unique and custom. These counters can be metallic or matte and are always seamless with a luminous high gloss, which protects the color beneath. Epoxy is food safe, durable, heat resistant, and easy to clean.

“Epoxy countertops are really exciting from a design perspective,” says Sara. “I love their versatility and how the product can be used to achieve such amazingly realistic patterns mimicking marble and other popular countertop materials at a fraction of the cost. I really think this trend will be gaining momentum in kitchen remodels.”

Epoxy countertops can be professionally installed or, for those feeling adventurous, created as a DIY project. It can be applied over tile, laminate, wood, concrete, and other surfaces. If you want a specific pattern and a countertop that is top quality, Sara recommends foregoing the DIY option and leaving it to the pros.

Last on Sara’s list of trending countertop materials is porcelain. Once primarily used in tiles on kitchen and bathroom counters, this man-made material is fabricated in large slabs, which are then installed much like quartz or granite. Porcelain is durable and resists just about everything including stains, heat, scratches, chemicals, and UV light. It comes in a wide variety of colors and patterns, many of which look like marble or natural stone. Porcelain typically doesn’t require sealing and is an environmentally friendly option as it’s made from 100% natural clay-based materials and is completely recyclable, should you ever choose to change your counters in the future.

Sara explains, “Porcelain can be fabricated in extra large slabs and, because it is so thin, it can be applied directly over existing counters, if needed.”

When it comes to countertop trends and color, typically, whatever countertop material is chosen, Sara says her clients continue to prefer a high contrast between cabinets and counters.

When the time comes to reimagine your kitchen or bath, allow Harrell Design + Build’s design team to help you discover the possibilities. We offer numerous free inspirational and educational workshops and are always available to meet with you for a design consultation.

Sara Jorgensen, one of Harrell Design + Build’s award-winning designers, artfully executes her clients’ design desires coupled with their functional needs. Sara’s creative passion, authenticity, and open style of communication, enabling her to provide an innate understanding of client needs to the Harrell Design + Build Design + Build team. “Some clients know their style. Others need inspiration. Through the design exercises in which my clients’ partake, we come easily to an understanding of their preferences. The ultimate goal is to create a beautiful, timeless, on-budget, and functional project,” says Sara. Sara works from a holistic viewpoint to the smallest of details that create the design’s ‘wow’ factor. Her designs have won awards from the NKBA, NARI and National CotY and encompass a wide variety of projects from Wine cellars, Yoga rooms, Master Suites, Kitchens, and Decks to whole house remodels. A Bay Area native, Sara holds a Bachelors of Fine Arts in Interior Design from San Jose State University. Sara is a California state Certified Interior Designer (CID) and a Certified Green Building Professional (CGBP). Outside of work, Sara enjoys kayaking, San Jose Sharks hockey, snowboarding, cycling, snowman building, spending time with family and relaxing outdoors. She is a proud committee member of the Santa Clara Valley Model T Ford Club and enjoys driving her Model T around California on various club tours.

Universal Design and Kitchen Remodels

Genie Nowicki is one of Harrell Design + Build’s Universal Design experts. Passionate about creating living spaces that are functional, accessible, and beautiful, she explains how Universal Design can be incorporated into a kitchen “in small bites without major design changes.” Or, if a homeowner is undergoing a full kitchen remodel, more comprehensive changes can be integrated into the overall design.

“I fully believe that homeowners should take advantage of making their home accessible whenever the opportunity presents itself,” says Genie. “Many people think that Universal Design products will make their home look and feel like a hospital but in reality, they are beautiful. When a space is properly designed, you’d never realize it was created to be accessible. And accessibility can benefit the entire household.”

The Small Bite Approach

Even if you don’t plan to undertake a major kitchen remodel, there are still Universal Design principles that can easily be applied. Cabinet hardware and faucets can easily be changed, appliances can be upgraded to those allowing easier access, and existing cabinets can be modified using special storage solutions, drawers, and unique shelving units that extend outward.

Simple Universal Design Solutions

  • Cabinet hardware: install pulls instead of knobs
  • Faucets: Install a single lever faucet to the side of the sink to allow for easier reach
  • Drawers: use full extension for increased accessibility
  • Base Cabinets: Use roll-outs and drawers versus shelves
  • Upper Cabinets: Forego a backsplash and have cabinets come all the way down to the counters
  • Storage Accessories: Installed inside cabinets, these make items easier to reach
  • Dishwashers: Choose an appliance manufacturer, like Fisher Paykel, that offers dishwasher drawers rather than doors.
  • Refrigerator: Choose a unit with the freezer drawer on the bottom
  • Wall Ovens: Install at a comfortable, reachable height. A better choice than a one-piece range
  • Microwave: Install at a level accessible to those seated or standing

Genie explains, “One of the most ingenious Universal Design products I’ve discovered is made by Hafele, a company that offers a variety of kitchen storage solutions as well as cabinet hinges. They have a hinge mechanism that allows upper shelves to pull out and drop down to a lower level, making them fully accessible to someone who is seated or has any issue with reaching high places.”

Incorporating Universal Design Into a Kitchen Remodel

Updating your kitchen is the perfect opportunity to maximize accessibility. It allows a design to be achieved that creates ample space and reachability alongside function and beauty.

Comprehensive Universal Design Solutions

In addition to those accessibility features listed above, the following solutions can be included when a kitchen is being fully redesigned.

  • Ample aisle space: A minimum of 48 inches between counters and one 60-inch diameter open space to allow a wheelchair to turn around
  • Counter heights: Standard counters are 36 inches but to achieve the best accessibility, 33 inches is ideal. Having counters at both heights creates multiple useable workspaces, with the lower counter also serving as an accessible space for young children or as a baking center.
  • Flooring: Smooth, non-skid surfaces with seamless transitions ensure durable, easy to maintain floors that virtually eliminate tripping hazards and allow for mobility devices to move easily in the space. Hardwood, luxury vinyl tile, engineered wood, porcelain tile with machined edges, linoleum, and sheet vinyl are all viable options.
  • Cooktops: Induction units are responsive and easy to clean. These electric appliances only heat the cookware; the surface itself never get hot, virtually eliminating the risk of fire or injury.
  • Stove hoods: Choose an appliance with a remote-control unit that can be mounted on the side of a reachable cabinet.
  • Outlets and switches: Place on the face of cabinets or at levels that are easily reachable by those in seated positions.
  • Lighting: Use of natural light sources in addition to LED fixtures create ample light. Recessed or surface mounted fixtures are ideal for overall illumination while under-cabinet task lighting should be installed at the front underside of cabinets. Decorative pendant lights over islands are also popular.
  • Counters: Polished black granite or quartz is a very reflective surface. This can cause a lot of glare making it uncomfortable to sensitive eyes when lighting bounces off.
  • Pull out breadboards: Create an instant, functional “roll under” work area.
  • Rolling carts or butcher blocks: These allow for easy transport of ingredients, dishware, or other kitchen items for those using mobility devices.
  • Appliance lifts: These mechanisms are installed inside cabinets and eliminate having to lift and move heavy appliances such as mixers. The appliance is securely placed on the lift which easily pulls up and locks into place. These mechanisms require a larger, 18-inch cabinet.
  • Roll-under sink and cooktops: By designing an open space beneath cooktops and sinks, individuals using wheelchair are able to get close enough to wash dishes and prepare meals. Drains and garbage disposals should be located toward the back of a shallow sink.

Genie explains that an additional level of thoughtful design is required when applying Universal Design, especially in kitchen spaces. The initial interview process is critical in understanding how the homeowners use their space, allowing a designer to problem-solve, often creating a functional solution that didn’t previously exist. Things like plumbing and electrical along with counters, storage, and creating ample space all need to be planned in advance.

“The kitchen is a very personal space and there are numerous ways to integrate UD products and principles, many of which depend upon the homeowners, their lifestyle and how they use the space,” Genie offers. “There is a unique motorized solution for sinks or cooktops. With the push of a button, the counter raises or lowers up to six inches. This product takes preplanning but adds an amazing level of accessibility.”

Incorporating Universal Design doesn’t require a significant kitchen remodel. There are many aspects that can be applied without major design changes. But if you are contemplating a kitchen remodel, integrating accessibility features is something to seriously consider, especially if this will be your forever home.

Schedule a complimentary consultation with one of Harrell Design + Build’s designers to learn more about Universal Design and how it can increase the functionality, accessibility, and beauty of your Silicon Valley or San Francisco Bay Area residence.

Premier senior designer, Genie Nowicki, is certified in numerous forms of design and the recipient of multiple awards. Genie joined the Harrell Design + Build team after years of running her own successful design business. Beginning her career in the world of income tax planning, she made a career leap in 1990 to the equally “detail and code-filled world” of kitchen and bath design. Genie obtained her Certification in Professional Kitchen and Bath Design in 1992 and achieved her Certified Kitchen Designer (CID) and Certified Bath Designer (CBD) status in 1996. After passing another rigorous examination, she became a Certified Interior Designer (CID) in the State of California in 2002 and a Certified Aging in Place Specialist (CAPS) in 2006. Her experience has included residential interior design, kitchen and bath design, barrier free/Universal Design, lighting design, and participation in numerous showcase houses in the Bay area, as well as several commercial projects. Genie prides herself on listening to her clients and providing timeless design work that is appropriate to her clients, their lifestyles, and their homes. Her excellence in design has been recognized with awards, projects published in local and national magazines, and a Sunset design book, and an article she wrote was featured in the Fine Homebuilding Kitchen and Bath Annual Issue.

Creative Options for Island End Caps

With islands becoming more of a standard kitchen feature, more imaginative ideas are emerging for how to use island end caps. Depending upon whether the homeowner prefers them to be a focal point or simply to blend in plays a role in the ultimate design.

“Understanding the client’s needs along with the overall design aesthetic helps me to guide them with end cap options,” shares senior Harrell designer, Sara Jorgensen. “During our in-depth planning meetings, I ask a lot of questions: Do they prefer clean, simple lines? Do they need more storage or want a place to showcase special kitchen platters or décor? Do they want a special spot for their kitty or pup?”

Creative ways to use island end caps include:

Open bookcase: End caps offer an ideal location to house and display favorite culinary tomes.

Storage: Most homeowners can use more rather than less storage. End caps offer perfect locations to visually highlight key display pieces facing the living space. This could be open storage or a cabinet with beautiful glass doors and interior illumination. For hidden storage that is easily accessed, adding in drawers or doors on the opposite side allows frequently used item to be tucked away. This is a perfect place to store homework items, entertainment ware, beverage items, microwaves, and more.

Pet-friendly niche: Many people have pets and the kitchen is the primary location for food and water bowls. A special niche can be designed into an end cap, typically on the side facing into the kitchen, where bowls can be recessed and tucked out of the path of (human) travel. They can even be elevated for larger pets.

Wine rack: For wine lovers, incorporating a custom wine rack into their island end cap allows them to display their collection as well as have favorites close at hand.

Waterfall edge: For those who love the crisp, clean look of a continuous countertop, a waterfall edge is a stunning use of end caps. The counter material continues vertically all the way to the floor, creating a simple, uninterrupted line. Alternately, a waterfall edge can be created using a contrasting material such as natural wood.

Decorative element: As an alternative to a waterfall edge, end caps can be used to create a decorative element that offers visual appeal. This design can then be repeated in other areas throughout the kitchen. These elements can be traditional, classic, modern, farmhouse, or contemporary and as ornate or simple as desired.

“Determining which option works best is a very personal decision based on lifestyle, function, and personal preference,” Sara confirms. “But there are a lot of resourceful options to put island end caps to great use.”

If a kitchen, bath, or even a whole home remodel is something you would like to explore, we invite you to set up a consultation with a member of the Harrell Design Team. We also encourage you to visit our online project gallery to see our extensive kitchen, bath, and even whole-house remodels.

Sara Jorgensen, one of Harrell Design + Build’s award-winning designers, artfully executes her clients’ design desires coupled with their functional needs. Sara’s creative passion, authenticity, and open style of communication, enabling her to provide an innate understanding of client needs to the Harrell Design + Build Design + Build team. “Some clients know their style. Others need inspiration. Through the design exercises in which my clients’ partake, we come easily to an understanding of their preferences. The ultimate goal is to create a beautiful, timeless, on-budget, and functional project,” says Sara. Sara works from a holistic viewpoint to the smallest of details that create the design’s ‘wow’ factor. Her designs have won awards from the NKBA, NARI and National CotY and encompass a wide variety of projects from Wine cellars, Yoga rooms, Master Suites, Kitchens, and Decks to whole house remodels. A Bay Area native, Sara holds a Bachelors of Fine Arts in Interior Design from San Jose State University. Sara is a California state Certified Interior Designer (CID) and a Certified Green Building Professional (CGBP). Outside of work, Sara enjoys kayaking, San Jose Sharks hockey, snowboarding, cycling, snowman building, spending time with family and relaxing outdoors. She is a proud committee member of the Santa Clara Valley Model T Ford Club and enjoys driving her Model T around California on various club tours.

Discover Your Design Preference: Create a Houzz Idea Board

One of the best ways to discover your personal design aesthetic is to explore images of living spaces. Most people know what they like when they see it, be it color, floor or counter materials, the layout or theme of a room, or a specific architectural design style, but many don’t know quite how to put these preferences into words. Pictures are an ideal way to share with your designer exactly what you like – and what you don’t.

“I love Houzz Idea Boards,” enthuses Harrell Designer, Divya Vijayanandakumar. “Pictures speak volumes. They expose clients to different ideas, which in turn helps them articulate their design aesthetic as well as narrow down and assist in translating preferred style, materials, fixtures, and color.”

If you’ve never been to Houzz.com, this website focuses on all things residential. From specific design styles, room design and remodels, lighting, fixtures, window coverings, materials, you name it and Houzz has it. Their Idea Boards provide a way for homeowners to explore, save, and share images and comments with their designers. This is a much more efficient and effective way to gather all your images in one place (versus sending images via email or text to your remodel team members) to provide visual context to your remodel preferences.

If you’ve never created a Houzz Idea Board, it’s simple.

  1. Go to Houzz.com, create an account, and sign in
  2. In the top right corner, click on Your House
  3. Choose Idea Books
  4. Click Create a Book – here you can name your book (Kitchen remodel for example) and add a description if desired
  5. Save your Book – be sure to leave the Make Idea Book private option off to enable sharing
  6. Once saved, you’ll see a pop-up window asking you to share your Book with others using their email addresses. This can be especially helpful for your designer, Design + Build firm, contractor, etc.

You can create as many or as few Idea Books as you’d like. If you are undergoing a whole home remodel, you may want to create separate books for your kitchen, Master Suite and Bath, Living and/or Family Rooms, and Outdoor areas. This allows you to place images into each that pertain to specific living spaces. In a Kitchen Idea Book, for example, you may include images on cabinet styles and colors, countertop materials, islands, fixtures, lighting, flooring and more.

How to Add Images to an Idea Book

Adding images to an Idea Book is simple. Log into your Houz account, open the applicable Book and choose Add Images. You can search the almost endless array of photos on Houzz by typing in search terms, or choosing a starting point recommended by Houzz. You can also upload images from your computer if you have photos from, say, a model home, magazines, or a friend’s residence that you’d like to include in your Book. To do so, click the small upload file icon in the left-hand corner below the green Invite button.

Houzz also provides helpful filters to narrow down the types of images. This is helpful if you know you like farmhouse style kitchens, for example. But for many, starting with a broader search may unearth styles, products, and ideas they wouldn’t have known to explore.

To save an image, click on the Save Photo icon on the image. Ensure it will be saved in the appropriate Idea Book. Be sure to add comments about what you like in that photo.

Says Divya, “It is especially helpful when clients specify what it is they like about each image. Most pictures have a lot of components so telling us you love the cabinet style but not the color allows us to better understand and narrow down your preferences and exactly what it is you like.”

Once you’ve created and shared an Idea Board, you can continue to update it, adding more images, even deleting ones you’ve previously saved, and your designer will instantly have access to whatever changes you’ve made.

A picture really is worth a thousand words. A huge part of the thrill of a remodel is unearthing your distinct design style. Houzz Idea Boards are an excellent way to explore and discover what moves you as well as to communicate and share these preferences with your Design + Build team.

Harrell Design + Build has been designing and remodeling distinctive homes since 1985. A full-service, 100% employee-owned design and construction company, Harrell a single point of contact, a proven process, and award-winning design. We invite you to stop by our Design Center in Palo Alto or schedule an appointment to discuss your home improvement project with one of our amazing designers.

Having created over fifty compelling interiors in both India and the Bay Area, Divya Vijayanandakumar brings a wealth of design experience to Harrell Design + Build Born and raised in Chennai, India, the most significant cultural, economic and educational center of south India, Divya initially pursued Computer Science but after graduating with a Bachelor’s degree, she did a career about-face, deciding to come to Silicon Valley in 2004 to attend West Valley College, where she achieved her AA degree in Interior Design.

After working in a residential firm as a Junior Designer and then moving to a commercial firm as a Senior Interior Designer contributing her talents to large-scale office buildings as well as healthcare and educational facilities, Divya moved back to India in 2011. She spent a few years working at a high-end residential design firm before launching her own residential and commercial Design + Build company, The Plan-D, whose award-winning designs were featured in none other than Vogue Magazine.

Once again, the Bay Area called and Divya answered, relocating once again to Silicon Valley and joining Harrell Design + Build in May 2019 as one of our Designers. Divya brings with her a keen eye for design aesthetics along with a deep-rooted understanding of field work, project management, and entrepreneurship.

A LEED Accredited Professional in Building Design and Construction, Divya also has her Evidence Based Design certification and accreditation. She is driven by creating a sense of function and beauty by understanding the deepest wants and needs of her clients. She fully believes that that grade of work you offer the world reflects that strength of respect you have for yourself, and lives by this credo through her integrity, professionalism, patience, and empathy.

Warming Drawers, Convection Ovens & Induction Cooktops

Good food and a warm kitchen are what makes a house a home. Warming drawers, convection ovens and induction cooktops are a popular choice in kitchens where cooking, entertaining or family gatherings are a focus.

Choosing the proper appliances to meet your culinary requirements is one of the many decisions a homeowner must consider during a kitchen remodel. Harrell Certified Kitchen Designer, Debra Winston advises her clients to consider how they cook, entertain, and their overall lifestyle when considering cooking units.

Debra explains, “Appliances for kitchens continue to evolve with more pre-programed settings to make cooking more pleasurable and more precise. There are many finish options now, available in suites such as matte black, shiny black, slate, rose gold, and the classic stainless steel. Look for smudge, scratch, and fingerprint resistant finishes. Also, newly popular is bright white in either a gloss or matte. Made with a powder coated finish, these whites won’t turn yellow with age. Bright pops of color such as orange or French blue can become an exciting focal point of the kitchen.”

Warming Drawers

These units are an entertainer’s must-have, perfect for warming food as well as keeping dinner hot for a family member who comes home late. It can also be used to warm plates and cups and is a champ at heating damp finger towels to the ideal temperature. They can also be used to proof bread and other yeasted doughs, make homemade yogurts or ferment foods. Warming drawers are typically 30 inches wide by 10 inches high and can be located below a wall oven or cooktop.

Convection Ovens

These ovens use a fan to uniformly circulate hot air, which results in faster cooking at lower temperatures. Convection units create an even, golden brown for baked goods and a toothsome crispy texture for baked poultry. Though available in gas and electric, the latter is preferred for baking. Convection ovens come in a variety of sizes as well as freestanding and wall units, ensuring you can choose the appliance that best fits your new kitchen design.

Induction Cooktops

Cooking with induction is safe, fast, and much more energy efficient than gas or electric. These cutting-edge cooktops and ranges use electromagnetic coils under a glass surface to create heat directly into cast iron, carbon steel, or magnetic stainless-steel cookware. (Aluminum, copper, and glass won’t conduct heat on an induction cooktop.) Since the heat is transferred directly to the cooking vessel, cooking is accelerated while the cooktop itself remains cool. This effective, innovative and easy-to-clean design is ideal for households with young children and also works well as a Universal Design feature. Believe it or not, this technology has been around for quite a while, and prices have come down significantly. (One note of caution; if someone with an implanted pacemaker is very close to the cooktop for an extended period of time, there may be some interference from the magnetic field).

Harrell Design + Build’s premier design team is here to help you create the kitchen of your dreams, including offering insights into the brands and types of appliances to fit your lifestyle and budget. Contact us to set up a complimentary meeting at our Palo Alto showroom with one of our award-winning designers to explore your kitchen remodel.

Debra has been with Harrell Design + Build Design + Build for five years. She has a Bachelor’s degree in Fine Arts, is an accomplished painter and quilt artist, and spent 13 years working for Ralph Lauren in New York City as a fashion designer before moving to California. She studied Interior Design at Cañada College, where she specialized in Kitchen and Bath Design. She worked as an Interior Designer prior to joining the Harrell Team in April 2014. Debra has received numerous awards for her designs, her specialty being Kitchen and Bath redesign, as well as color consultation. She is a passionate Universal Design Certified Professional (UDCP), and also works on whole-house remodels and room additions.

5 Universal Design Ideas for Beautifully Functional Laundry Rooms

Universal Design centers around creating spaces that are comfortable, accessible, safe, and usable to the greatest extent possible by people with varying levels of physical abilities. A forward-thinking concept, Universal Design principles can be applied in ways that seamlessly meld function and aesthetics to achieve spaces that fit your lifestyle now and into the future.

The laundry room is a utilitarian space that warrants thoughtfulness to ensure its functionality extends to all people. These spaces are best located at the primary point of use. The majority of a household’s laundry is generated from bedrooms and baths, so situating this space close to sleeping and bathing areas minimizes transporting bulky hampers long distances.

When redesigning a residential laundry, Harrell’s resident Universal Design specialist, Genie Nowicki, suggests keeping these five principles in mind.

1. More Space

Many laundry areas are small and constricted. By designing a laundry with more floor space you allow easier maneuverability and accessibility.

2. Lower Sink

Utility sinks are a great addition to a functional laundry area. To ensure the sink is reachable by someone in a seated position, the sink should be shallow (to meet ADA standards), the countertop approximately 32 inches high, be open underneath, and have an accessible faucet with lever handles.

3. Front Load Washer & Dryer

Front loading washers and dryers placed on storage pedestals are more ergonomic for everyone. The washer and dryer doors should open away from one another to allow for easy transfer of clothing. Place the washer in a metal pan with an exterior drain to avoid water damage should the unit leak or overflow.

4. Reachable Storage & Hanging/Folding Areas

Many laundry rooms have wall-mounted cabinetry but having lower storage that is easily reachable is a must in a Universally Designed space. Rolling hampers, which can easily be moved room-to-room as well as storage pedestals beneath washers and dryers meet the needs of those unable to access tall cabinets. Rods and folding spaces placed at varying heights allow clothing to easily be hung and folded by those both standing and seated. Pull-down storage and rods are also available.

“Using rolling hampers really benefits anyone doing laundry. They make it easier to transport laundry from room to room rather than lugging heavy, cumbersome baskets or hampers,” recommends Genie.

5. Good Lighting

Proper light is important, especially for those whose vision is in any way compromised. Recessed LED lighting and under cabinet lights provide bright task lighting, especially in a space that may have no exterior windows. If there is a window, a motorized window covering allows the shade to open and close at the touch of a button.

6. Bonus Design Feature: Pet Spaces

For pet lovers, the laundry room is also an ideal place to install and dog bath and/or a litter box alcove. Dog baths should be fully waterproofed and tiled and be raised 8 to 12 inches off the floor for ideal comfort and ergonomic design. They could also have a bench on which the bather can sit, a handheld showerhead, a glass door to contain spray from the inevitable post-bath shake, and a niche for all those pup grooming products.

Litter box alcoves keep unsightly litter boxes discreetly tucked away, and help keep the littler a bit more contained. Installing a fan will help keep odor to a minimum. The access for cleaning the box should be at a comfortable height and should be wide enough to allow the box to be removed and the inside of the alcove swept or hand vacuumed.

Doing laundry is a task undertaken by just about every household. Having a laundry room that is attractive, accessible, and functional can make this chore much more palatable. And by integrating aspects of Universal Design, this residential space becomes usable by all.

Harrell Design + Build has been designing and remodeling distinctive homes since 1985. Discover how we can recreate and redefine your residence to fit your Silicon Valley lifestyle by scheduling a complementary consultation with one of our award-winning designers at our or Palo Alto showroom.

Premier senior designer, Genie Nowicki, is certified in numerous forms of design and the recipient of multiple awards. Genie joined the Harrell Design + Build team after years of running her own successful design business. Beginning her career in the world of income tax planning, she made a career leap in 1990 to the equally “detail and code-filled world” of kitchen and bath design. Genie obtained her Certification in Professional Kitchen and Bath Design in 1992 and achieved her Certified Kitchen Designer (CID) and Certified Bath Designer (CBD) status in 1996. After passing another rigorous examination, she became a Certified Interior Designer (CID) in the State of California in 2002 and a Certified Aging in Place Specialist (CAPS) in 2006. Her experience has included residential interior design, kitchen and bath design, barrier free/Universal Design, lighting design, and participation in numerous showcase houses in the Bay area, as well as several commercial projects. Genie prides herself on listening to her clients and providing timeless design work that is appropriate to her clients, their lifestyles, and their homes. Her excellence in design has been recognized with awards, projects published in local and national magazines, and a Sunset design book, and an article she wrote was featured in the Fine Homebuilding Kitchen and Bath Annual Issue.

Designing Beautiful and Functional Baking Stations

Designing A Roof With Curb Appeal

We’ve all driven by houses that have that certain something. These welcoming, attractive homes have that much sought-after moniker referred to as curb appeal. All of the exterior elements come into play – landscaping, color of the house, entry door, windows – to create a cohesive and inviting appearance. Yet there is one important element we don’t often consider when it comes to curb appeal: the roof.

Harrell Design + Build Designer, Rafael Gomez, studied architecture and worked in both commercial and residential firms before joining Harrell.

“I remember early on in my career, designing rooflines was my biggest fear. I couldn’t grasp how what was going on inside a home could be matched up in a proportionate, balanced way with the roof,” reflects Rafael. “The experience in figuring this out was valuable in teaching me how interior and exterior architectural elements worked together. Now, I really enjoy creating rooflines that add to the beauty of a client’s home.”

There are multiple components that make up a roofline:

  • Shape
  • Pitch
  • Mass/scale/proportions
  • Continuity
  • Flow

The goal is to find the right balance of each of these elements while also designing a roofline that is in line with the overall architecture style of a home. It is also important to consider the neighborhood in which you live so your home fits within the overall residential look and feel of the surrounding area.

“To maintain the architectural integrity and continuity of their neighborhoods, many cities have architectural guidelines that impact what homeowners can do to the exterior of homes,” explains Rafael. “It is always advised to gather all of this information in advance of starting a project.”

The proper use of materials and design elements also helps to create curb appeal. Dormers with windows, enclosed soffits, gutters and downspouts, vents, and rafter tails that have a distinct design are all ways to add visual appeal to a roofline.

There are also a myriad of roofing materials that can enhance the beauty and resale value of your residence. Certain materials look best with specific architectural styles so it is wise to take this into consideration as well as the pros and cons of each type of roofing.

Thanks to their affordability, approximately 70% of homes in the United States have composition/asphalt shingles. This roofing material comes in an incredible array of colors and profiles, and is a great option for many types of houses. Available in clay, concrete, slate, and fiber cement, tiles are another roofing material that can offer a dramatic profile for the right style of home. Wood shakes, once very popular, offer an attractive, upscale appearance but tend to be considerably more expensive than their composite counterparts. Metal is a great option to achieve a farmhouse look, or for use on a feature area, such as an accent on an entry, dormers, or bay window. Solar tiles are an up and coming roofing product, eventually replacing the large and unsightly solar panels that can often detract from an otherwise attractive roofline.

Designing a roofline that accentuates your home, especially if you are undergoing a significant addition or remodel, can positively impact your curb appeal. It’s critical to ensure your roofline has a balanced appearance, it structurally sound, and properly ventilated. Working with a designer to assist in selecting the finishes, materials, and other elements guarantees a consistent architectural aesthetic and a home that has one heck of a WOW factor!

Let Harrell Design + Build help you achieve a roof with incredible curb appeal! Schedule a complimentary session with one of our talented designers at either our Los Gatos or Palo Alto showrooms.

One of Harrell Design + Build’s premier designers, Rafael Gomez has a background in Architecture and his extensive design experience brings a bold and forward-thinking edge to the Harrell Design + Build Design + Build team. After graduating from Universidad Autonoma De Guadalajara in 1994 with a Bachelor of Science in Architecture, Rafael became a licensed Architect in Mexico. In 1995 Rafael began his professional career in San Francisco working in both commercial and residential architecture firms. Having worked in the field of design and construction, Rafael possesses a comprehensive design philosophy, which begins with the assumption that design is an intelligent process through which people arrange their environment. Establishing a relationship with his clients based on mutual trust and respect, Rafael carefully listens to client needs to create a custom design that fits their unique lifestyle. Designs that allow for function, durability and longevity are Rafael’s trademark. Thanks to his extensive project feasibility research and collaboration with our production department and engineers guarantee, these designs come to life. Rafael joined the Harrell Design + Build team after 12 years of Design + Build experience. His vision and attention to detail have won him many awards from NKBA kitchen renovations to whole house remodels as well as new homes.