A Guide to Building and Caring for a Raised Bed Home Garden
Residential vegetable gardens have a deeply rooted past in the United States, a reflection of lifestyle – be it necessity or leisure – of those who cultivate them. The Shelter in Place has rekindled interest in the home garden as many people either have the time to spend tending to a garden, are seeking out projects they can do as a family, or prefer to have their favorite vegetables close at hand to minimize trips to the market.
With this in mind, Harrell’s Remodeling’s certified landscape designer Lisa Parramore, APLD (Association of Professional Landscape Designers), with the help of Production Team Manager, Gary Gray, decided to put together all of the ingredients needed to build and care for a raised garden bed.
“There is a simple practicality of having fresh herbs or produce at hand,” says Lisa, who is planting more tomatoes and other vegetables than usual since Shelter in Place took effect. “It can be so rewarding, especially when you see tiny seedlings sprout. But it is also important to be patient as you learn what will flourish best in your environment.”
Before embarking on your planting project, there are some thing to consider:
- Climate and environment: Depending on where you live in the Bay Area, the climate and local wildlife can vary. Both play a part in the types of vegetables, flowers, or herbs you choose, and you may need to create a barrier between your plants and hungry deer, raccoons, or squirrels. Sunset Magazine’s timeless series of gardening books has helpful climate zone information and your local gardening specialist may also be a good resource.
- Sunlight: Is your yard shaded or does it receive significant direct sunlight? Again, the amount of light will help determine which plants will thrive.
- Irrigation: Be sure to have a water source nearby. If you want to get really serious, you can install drip irrigation on a timer.
- Care: Any garden or plant is going to need a certain amount of care and attention – some more than others. In choosing you gardening strategy it will be wise to consider how much time you have to devote to daily watering and weekly or biweekly maintenance. But that’s all part of the fun and reward of gardening!
What to Plant
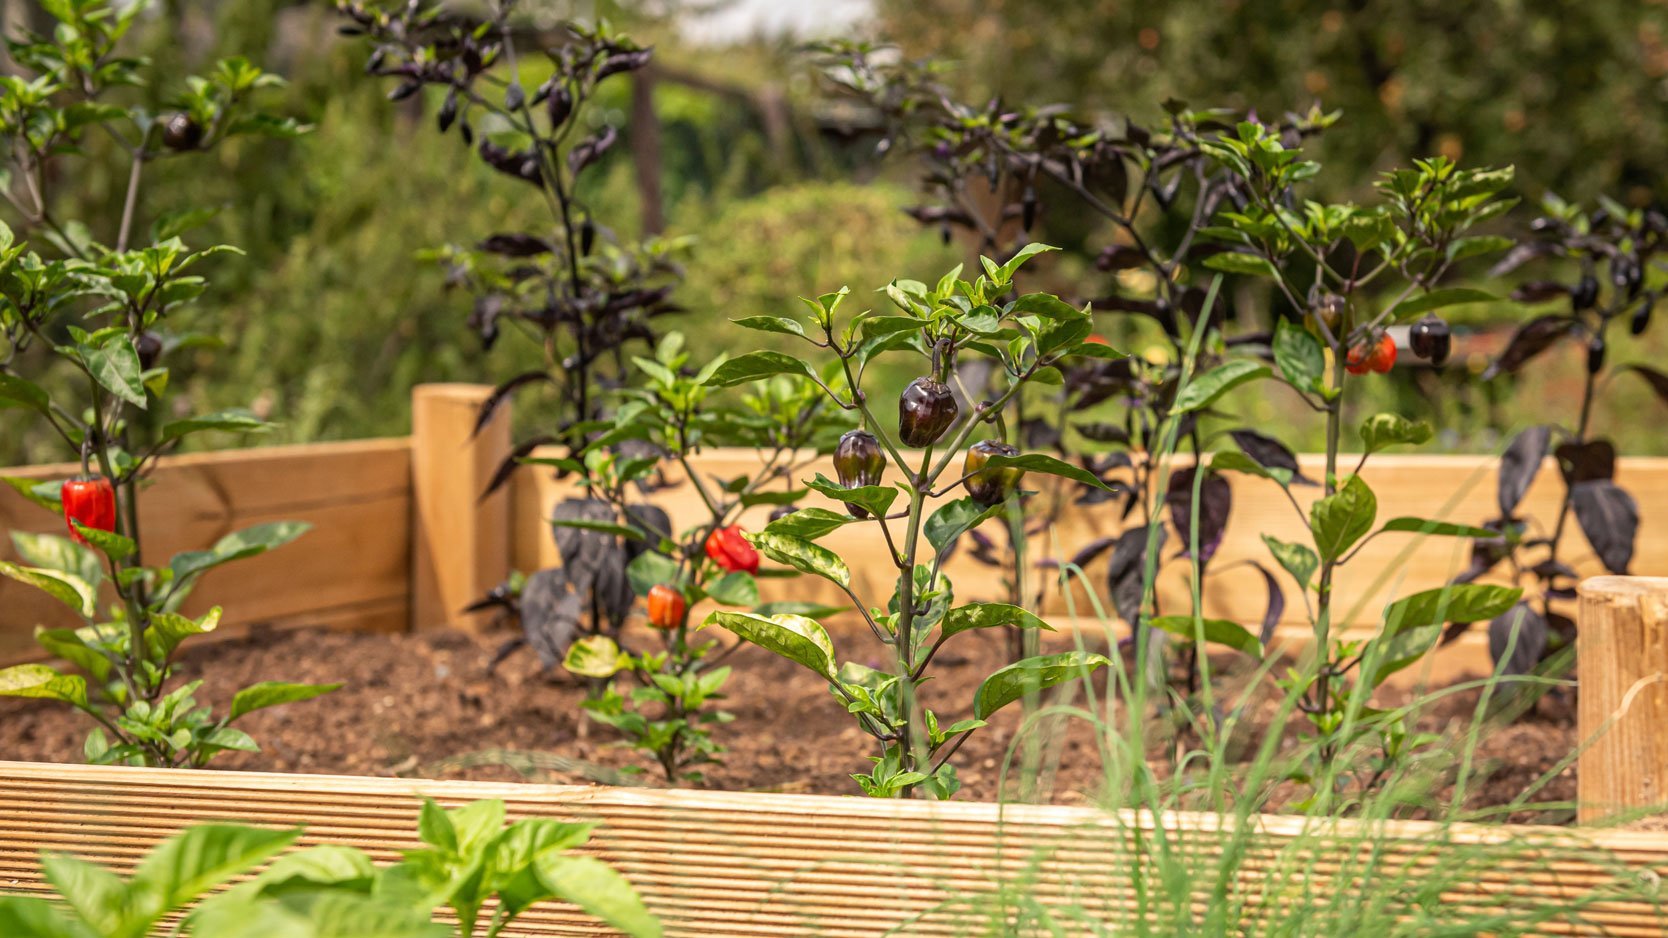
A garden can be filled with whatever the creator desires – vegetables, herbs, flowers, and even some fruits lend themselves to small garden spaces. Plant what you and your family will enjoy the most. A “salad garden,” “salsa garden,” or “kitchen herb garden” are fun, themed ways to focus your planting.
One of the best ways to choose what to plant is to read the back of the seed packets. Filled with specifics about watering, lighting, seasons, spacing, and more, seed packets are the gardener’s “go to” guide for information.
Your local nursery or garden supply store should also have seedlings or starters for many plants, which is an indicator that they are in season and are able to be planted now. Local home and garden specialists will also be a great source of information for home garden beginners. They are usually happy to share their knowledge about the local climate, planting options, potential pests, irrigation, and many other gardening tips.
Choose Your Planting Container
In this article, we will provide detailed instructions for building a raised garden bed, but there are many options for home gardens. For those with large yards, you can designate a space for in-ground planting if you choose. Those with smaller outdoor spaces can use other types of containers or pots, placing them in areas that allow the proper light. If you like the raised bed idea, there are pre-made beds you can purchase, or kits that have everything you need to assemble your own. Galvanized metal tubs or troughs also work well (just make sure there are holes for drainage).
Gather Your Tools
This list includes tools needed to construct a raised bed along with other gardening tools.
- Drill with 1/8” drill bit and Phillips #2 Screw Tip
- 3.5-inch wood screws (exterior grade)
- Measuring tape or ruler
- Pencil
- Gardening gloves
- Trowel
Materials You’ll Need
- Untreated wood (Redwood preferred; Douglas Fir 2nd choice; do not use Pressure Treated due to chemicals).
- Provide quantity and measurements and have the store cut the wood for you
- Three 2” x 10” x 8’-0” boards; cut one board in half netting two 4’-0” pieces.
- If you have the tools and really want the DIY experience, purchase full length lumber (Alternatively, contact Harrell Design + Build’s HarrellCARE Small Projects group to build it for you).
- Provide quantity and measurements and have the store cut the wood for you
- Weed blocking material
- Mesh hardware cloth, landscaping fabric or newspaper/cardboard
- Soil, compost and potting soil
- Use a 60/30/10 ratio
- See “recipe” below for quantity required
- Mulch (optional). Mulch can help with water retention and weed blocking
- Seeds or plant starters
- Supports for plants as they grow
- Tomato cages, plant stakes, bean trellises
- Plant labels-popsicle sticks work great
- Pesticides, preferably eco-friendly, specifically for vegetables
- Based on the pests found in your area, purchase a suitable vegetable pesticide
- There are many organic and eco-friendly ways to defend against pests
- Seek the advice of your gardening specialist
If you don’t have a large vehicle or prefer not to go inside your local gardening or hardware store, purchase online for pick-up or delivery.
Building Your Raised Bed
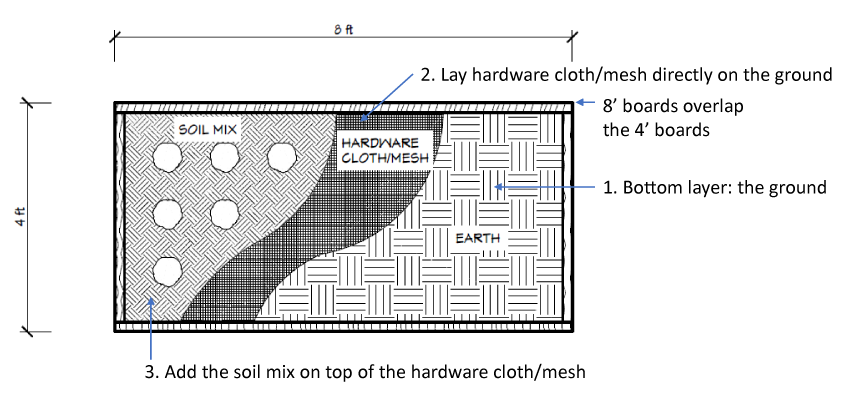
Gather all of your tools and materials. If possible, you will want to build the bed in or near its final location. Since this picture frame-like bed will sit directly on top of the ground, assembly is straightforward. If you have the space, you can construct multiple beds and place them side by side, in a variety of configurations or locations throughout your yard.
- Place one of the four-foot sections and one of the eight-foot sections together in an L-shape with the longer board overlapping the side of the shorter board.
- From the 8’-0” side, secure with four 3.5” screws allowing an inch space at the top and bottom.
- Secure each side with screws.
Preparing Your Bed for Planting
Once your bed is constructed and set in place, the fun really begins!
The soil recipe for a 4’-0” X 8’-0” X 10” raised bed includes:
- 16 cubic feet (20 one-quart bags) of topsoil
- 8 cubic feet (20 one-quart bags) of compost
- 2.5 cubic feet of potting mix
- 2.5 cups of organic fertilizer
- Place weed blocker mesh, material, cardboard, or newspaper covering the entire area of exposed earth inside the bed. You may wish to have the material go under the edges of the bed to help keep it in place.
- Add soil directly into the bed and mix with trowel or shovel.
- Based on spacing instructions, plant seeds and/or starter plants. Melons and squash need considerably more space than other fruits, herbs, and vegetables, and tend to spread out on the ground.
- Water using a hose attachment that allows for a gentle shower to avoid disrupting seeds. Keep the top six inches of soil moist until seedlings sprout.
SALAD GARDEN, SALSA GARDEN, HERB GARDEN LAYOUTS
Tending Your Home Garden
Watering: Once plants are established, encourage deep rooting by keeping top six inches of soil moist. Water when the top three to four inches of soil are dry to the touch.
Mulch: To maintain moisture and minimize weeds, add a two to three-inch layer of organic mulch around plants and seedlings once they appear. Pine needles, leaves, untreated grass clippings, and straw (not hay) can also be used.
Weeding: As soon as weeds appear, remove them. Don’t let them go to seed as they can then overtake your raised bed quickly.
Spacing: As seeds sprout, especially carrots, radishes, beets, and onions, eliminate overcrowding by removing seedlings in groups. This space encourages the remaining plants to mature.
Fertilize: Depending upon what you’ve planted, you may need to add additional fertilizer. It is best to refer to the seed packets or consult your garden specialist for advice.
Harvest: Each vegetable, fruit, or herb will mature at different rates. It is best to harvest when young and tender for maximum flavor. Avoid letting seeds mature in cucumbers, beans, or squash as this deters the plant from producing additional fruit. When harvesting leafy crops, leave two inches above ground to encourage regrowth. Pull all root plants as soon as they are large enough to eat.
“A home garden serves so many purposes and can fit many different environments, lifestyles, and spaces,” Lisa shares. “Not only does it provide fresh, delicious produce, gardening is a creative and nurturing activity that, especially in the Bay Area, can continue almost year-round.”
We would love to see and hear about your experiences from your home garden project! Share photos of your garden, raised bed, and your bountiful harvest on the Harrell Design + Build Facebook page and we will include them in an upcoming edition of our monthly newsletter.
Woman Founded and 100% Employee-Owned, Harrell Design + Build Design + Build has been creating distinctive homes in Silicon Valley and mid-Peninsula since 1985. We invite you to attend one of our virtual workshops or schedule an appointment with one of our award-winning designers to discover how we can redesign your home inside and out.